The Education of Me

lambI must admit, there was a time that I avoided Indian food.  Not because I did not like it.  In fact, at that point, I had not ventured to try it.  Growing up, I was exposed to the usual Chinese restaurant or Teppan grill as was in vogue at the time.  Beyond that, my only ethnic food experiences were the dishes my own Hispanic family prepared.

My first foray into Indian food was attending the birthday party of a friend.  It was held in a rather popular Indian restaurant.  I have a memory of picking up and smelling the various sauces and raitas on the table and felt out of my zone. What were they for?  It’s not as if we were presented with a basket of chips and a bowl of salsa.  There was no clear directive.  The aromas of the food, my inability to identify what was in the dishes , the heat that soared in my mouth and my belly as I took my first bites, weren’t unpleasant, but didn’t exactly evoke any feelings of want.   I left that first venture vowing to never eat Indian food again.  And I didn’t…for a very long time.

The next foray was years later with a friend and I had applied some lessons I learned from my previous adventure.  I ordered what I now think is innocuous and reeks of mediocrity; chicken tandoori.  It’s like ordering chicken teriyaki when you find yourself in a sushi restaurant; the act of a person that lacks adventure.  It was all very pleasant, but nothing extremely memorable.

So, we come to the visit that cinched it…  And perhaps it was cinched due to conditions, but it cinched it nonetheless.  A friend had talked me into what was known as the best Indian buffet in town.  As we were both a bit hung-over from the previous night’s activities, the smell of spice and the vision of curry potatoes and piles of naan seemed like a godsend.  I was more than eager and more importantly, starving.  There we were 11:00 on Sunday morning with glasses of ice cold beer and mounds of Indian food on our plates.  It was beyond delicious.  I was a goner.

However, unlike many ethnic foods, economical options for Indian food are sparse.  I went back to the buffet a few more times, but to be honest, I was not a fan of the ambiance or lack thereof.  After my initial infatuation subsided, I realized that when I ordered beer, the server would not speak but rather point to an oddly high shelf above the buffet that housed the ‘beer list’. In fact, barely a word was ever spoken.  It was a very utilitarian process. Show up, tell them how many, they point to a table, we sit down, they bring out water and walk away.  If we wanted beer, we had to flag someone down so they could point to that shelf and we point out our choice. We would then plod our way to the buffet for one of many trips. When our bill came, it consisted of the symbol “X” and the number of people in our party.  If beer was ordered, an additional” X “was added and the price of the bottle.  The first time and only time we asked for a bill total, they were rather reticent to comply.  This was a no fuss, no muss establishment.  Not exactly my favorite way to eat.

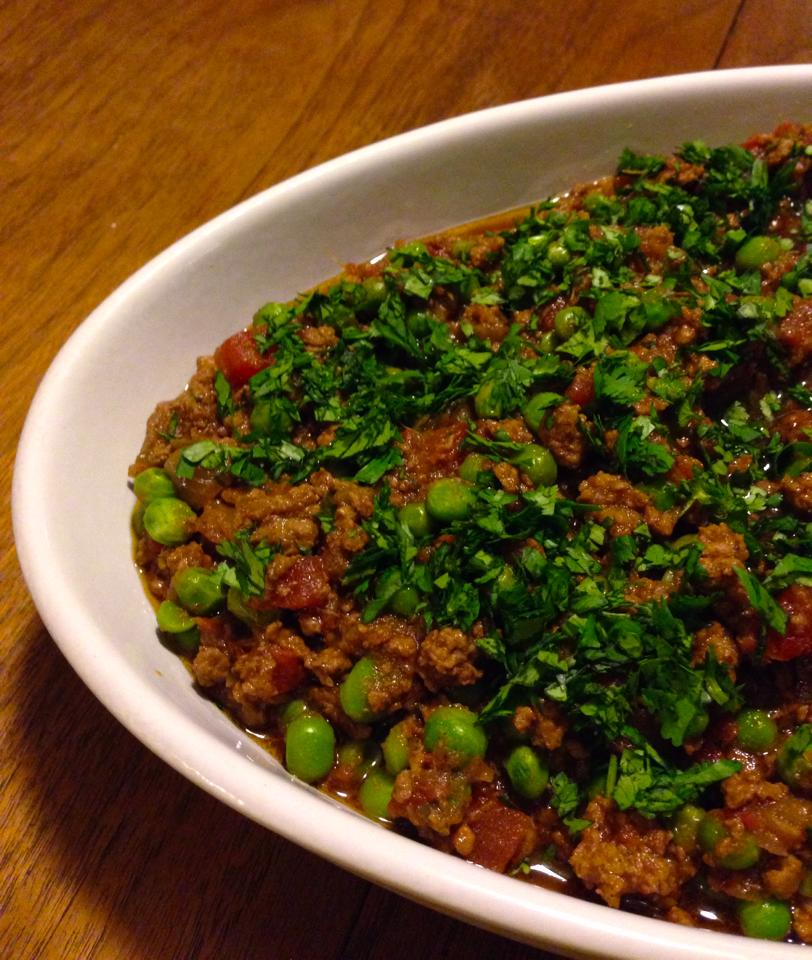
Since I prefer the ambiance of my home, I decided to learn some Indian dishes.  It wouldn’t be spot on, but I could focus on what dishes I enjoyed and even tweak the recipe to my tastes.  I ended up buying a copy of Easy Indian Cooking by Suneeta Vaswani.  One of my favorite dishes from this book is Ground Beef with Peas, otherwise known as Keema Matar.  I prefer to use ground lamb and serve it with cumin scented basmati rice, naan, and a simple cucumber-mint raita.  I have also swapped out the naan for butter lettuce leaves for an Indian twist on a lettuce wrap.

Keema Matar

2 TB vegetable oil

2 pounds of onions chopped (7 cups)

2 pounds of ground lamb (preferably ground from the leg)

1 ½ TB of minced ginger root

1 TB minced garlic

3-4 tsp of minced serrano chilies

1 TB ground coriander

1 ½ tsp of ground cumin

¾ tsp cayenne pepper

¾ tsp turmeric

1 ½ tsp salt to taste

1 (28 ounce) can of chopped tomatoes including juice

1 (10 ounce) bag of frozen green peas

1 tsp garam masala

1/3 cup chopped cilantro

In a large saucepan, heat oil over medium-high heat.  Sauté onions until beginning to color; 10-12 minutes.  Reduce heat to medium and sauté until dark brown, 25-30 minutes longer, stirring frequently to prevent sticking to the pan.  If necessary, deglaze periodically with 2 TB of water.

Add ground lamb, ginger, garlic, and chilies.  Brown well, stirring frequently, 15-20 minutes.  Continue to deglaze with water as necessary.

Reduce heat to medium-low.  Add coriander, cumin, cayenne pepper, turmeric, and salt.  Mix well.  Sauté; stirring continuously for 3-4 minutes.

Add tomatoes with juice, mix well.  Cover and cook for 10 minutes.

Add frozen peas and simmer for 10-15 minutes.  Remove from heat and sprinkle with garam masala.  Cover and let stand for 5 minutes.  Stir mixture. Finish with the chopped cilantro before serving.

In memorandum

As I sat on the couch yesterday morning with my cup of coffee, scrolling through my Facebook newsfeed, I read the news that Philip Seymour Hoffman had been found dead in his NY apartment.  I have to say, I felt such an incredible sadness.  Given that his death was announced while the majority of the country was gearing up for the Super Bowl, made the day feel rather manic.  I elected to avoid the glutinous football revelry and planned a quiet day at home.  I wanted warmth, comfort, and a space to mourn the passing of a person I did not know, but one that I seem to share a certain level of intimacy with, through his brutally honest portrayals of flawed people.

So, I prepared a chicken for the crockpot, opened a bottle of wine and watched Almost Famous.  No half time show, no ‘super’ commercials, no useless sport analysis; just me, a chicken, some wine, and Philip.  Rest in peace you talented man; you will be missed.

crock chicken

‘Roasted’ Crock Pot Chicken

  • 2 teaspoons paprika
  • 1 teaspoon salt
  • 1 teaspoon onion powder
  • 1 teaspoon thyme
  • ½ teaspoon garlic powder
  • ¼ teaspoon cayenne (red) pepper
  • ¼ teaspoon black pepper
  • 1 large onion
  • 1 leek (white part only)
  • 15 cloves of garlic
  • ½ pound whole crimini mushrooms
  • 12-15 baby dutch potatoes
  • 4-5 pound whole chicken
  • ¼ cup of fresh Italian parsley finely chopped

Clean and remove any hearts/neck/gizzards from the chicken.  Pat dry.

Combine the first 7 ingredients in a bowl, mix well to incorporate.

Chop the onion coarsely.  Slice the leek into ¼ inch slices.  Leave the garlic, mushrooms and potatoes whole.

Spread the spice mixture all over the chicken, under the skin of the breast, and into the cavity.

Place the onions, leeks, and garlic at the bottom of the slow cooker.  Place the chicken on the onions, leeks and garlic.  Spread the mushrooms and potatoes around the open spaces between the chicken and the side of the pot.  DO NOT add liquid.  There will be enough moisture released from the chicken, the onions and the mushrooms.

Turn the slow cooker to the high setting and cook for 5 hours.

Preheat your oven to 500.  If your slow cooker allows, remove the insert from the slow cooker and put directly into the oven to finish off for 30 minutes total. (If you are concerned about damaging your insert, you can remove the chicken and vegetables and place into a roasting pan.)  After the first 15 minutes, stir the vegetables to ensure even browning.   I do this added oven step to further concentrate the natural juices created in the slow cooker and to caramelize the chicken and the vegetables.

Remove the chicken from the vegetables.  Add the parsley to the vegetables and toss.  Allow the chicken to cool for 15 minutes before carving to allow the juices to redistribute throughout the chicken.  Assemble the chicken and the vegetables on a platter for service.  Spoon the pan juices over the chicken.

Preparation and Marination

cevicheI have often had friends and the like lament about the fact that they don’t know how to cook or they don’t like to cook.  And having a meal of many components can present the challenge of timing.  It’s hard to teach this skill to anyone because it really is born from mistakes, miscalculations, and recipe failures.  I have had my fair share of meals that didn’t come out like the fantasy that played on a continuous loop in my head.  And, I can recall more than a few times that halfway through eating, I realize I had completely forgotten to make a dish on my list.  Adding to all this planning and preparation is the pressure to not be running around like a crazy person while your guests are drinking wine and cautiously asking you if they can lend a hand.  I add additional pressure on to myself because I live by the rule that, other than a few last minute touches, I want to be socializing with my guests, not banging pots and pans in the kitchen while mutter profanities.  So, I often design meals around something that can easily be prepared (and is actually better) in advance.  Ceviche meets this need.  I can prepare it in advance and having it chilling in the refrigerator.  This allows me to focus on side dishes.  And more importantly, I have time to prepare a pitcher of Palomas!

And here’s some guidance regarding ceviche.

Make sure that you are purchasing your fish from a reputable source that moves fish consistently.  Since this is, in essence eaten raw, the quality and freshness of the fish should not be compromised.  Oddly enough, you don’t want your ceviche to taste too…fishy.

I also prefer to purchase wild fish whenever I have the option.  I can only suggest, that when an opportunity presents itself, try to do a comparison between farm raised and wild fish.  This is the best way I know to illustrate the difference between the two.

When purchasing your fish, have the fish monger/butcher remove the bloodline, any skin, and the bones.  Explain to them what you are using the fish for.  If you are purchasing from the right place, they will know what to do. I am fortunate to have Sunh Fish in Sacramento to meet all my seafood needs.

Prepare your ceviche in a glass bowl.  This allows you a better view to ensure that all your fish is getting ample exposure to the lime juice and curing properly.

You can prepare the ceviche a couple of hours prior to serving. However, please keep it cold.  Remove from refrigeration when you are ready to serve.

Ceviche

  • 1 pound of wild white fish, less on the oily side (ono, snapper or halibut when in season)  cut into 1/3 inch dice
  • The juice of 1-2 limes
  • 1/3 cup of finely minced red onion
  • 2-3 teaspoons of finely minced jalapenos (seeds and vein removed)
  • 2-3 teaspoons of finely minced chives
  • A handful of roughly chopped cilantro.
  • 1-2 whole avocado cut into ½ inch cubes
  • 2-3 tablespoons of good quality extra virgin olive oil
  • Freshly ground salt and pepper.

Combine the fish, lime juice and onion together in a glass bowl.  Fold to combine well and ensure that the lime juice is equally distributed.  I use a rubber spatula to avoid bruising the fish.  Allow this to sit for 15 minutes.

Fold in the jalapenos, chives, cilantro, and avocado.  Drizzle with olive oil.  Salt and pepper to taste.

Serve with crackers, chips or fill mini taco shells with the ceviche.

Clean

Kale quinoaThe other morning as I slipped on my boot and pulled up the zipper, I swear that it felt tight. It’s one thing to not fit into your ‘skinny clothes’ after the holiday season, but things take on an ominous tone when your shoes feel tight. Shit. Just. Got. Serious.

The thing I love (food), converts into the thing I hate (fat). Yep, I have added a winter layer of pounds. At this point, it’s not at DEFCON levels, but it’s time to clean up my act. All those indulgent winter practices need to be dialed back and the free for all eating must be tempered. Yes, it’s back to the green as I like to say; green juices for breakfast and lunch, clean eating for dinner. And if anyone is a ‘juicer’ out there, you most likely have an abundance of kale in your refrigerator. I recently became obsessed with massaged kale salads. This particular recipe combines my favorite green with tricolor quinoa for the ultimate power salad.

Massaged Kale and Quinoa Salad

  • 1 bunch of curly kale, stalks removed and discarded, leaves thinly sliced
  • 1 lemon, juiced
  • 1/4 cup extra-virgin olive oil, plus extra for drizzling
  • Kosher salt
  • 2 teaspoons honey
  • Freshly ground black pepper
  • 1-2 cups of cooked and cooled quinoa
  • Small handful toasted, unsalted pecans
  • One firm avocado, sliced.

In large serving bowl, add the kale, half of lemon juice, a drizzle of oil and a little kosher salt. Massage until the kale starts to soften and wilt, 2 to 3 minutes. Set aside while you make the dressing.

In a small bowl, whisk remaining lemon juice with the honey and lots of freshly ground black pepper. Stream in the 1/4 cup of oil while whisking until a dressing forms, and you like how it tastes.

Add the quinoa and the pecans to the kale; then pour the dressing over and toss. Add the sliced avocado on the top and serve.

Nesting

shortribThis year has been a big one.  My father fell ill and passed away over the summer.  I had the arduous task of cleaning out what essentially was a ‘hoard’ and moving some of those items into my home.  I felt the weight of those items as they took over my study and the garage.  I routinely kept the door closed to the study and avoided the garage; out of sight, out of mind.  However, I had to acknowledge that ignorance is not dealing.  And… I. Had. To. Deal.  Over the course of the last few months, I started purging items.  My free days were filled with trips to Goodwill, trips to the dump, old photos, boxes of paperwork and occasionally tears.  My parents tended to have too much stuff and I operate under the ‘less is more’ belief system.  I decided to go beyond clearing out the remnants of my parent’s lives, I moved on to my things as well.   As I rid myself of things that occupied space, but ultimately didn’t add anything to my life, I felt my home becoming more and more my home with each cleared box.

The weekend before Christmas, I was really enjoying my cleaned, organized, minimalistic home.  Things were so cleaned out and organized that I set up a gift wrapping station, turned on some music and tended to the presents.  But true nesting didn’t occur until I had something cooking in the kitchen.  In between wrapping gifts, I browned 6 pounds of short ribs to start their 3 hour braise.  The routine, the order of cooking was a sign to me that my life, although slightly different, and my home had been restored.   And those short ribs never tasted better.

Braised Short Ribs

  • 6 pounds of bone-in short ribs
  • Salt
  • Olive oil
  • 1 large sweet onion, cut into ½ inch pieces
  • 2 ribs celery, cut into ½ inch pieces
  • 3 peeled carrots, cut into ½ inch pieces
  • 10-12 garlic cloves
  • 1 ½ cups (12 ounces) tomato paste
  • 2-3 cups of hearty red wine (I tend to use a ratio of 3 parts red wine, 1 part port)
  • 2-3 cups of water
  • 1 bunch of thyme tied with kitchen string
  • 2 bay leaves
Preheat the oven to 375 degrees

Generously season each short rib with salt. Coat a large Dutch oven with olive oil and bring to a high heat. Add the short ribs to the pan and brown very well, about 2 to 3 minutes per side. Do not overcrowd the pan. You may need to cook in batches; remove ribs if need be to a plate until you have finished browning them all.

While the short ribs are browning, puree all the vegetables and garlic in the food processor until it forms a coarse paste. When the ribs are all very brown, remove them all from the pan. Leave a small amount of oil in the pan and add the pureed vegetables. Season with salt and brown them until they darken and from a crust on the bottom of the pan; approximately 5-7 minutes. (Onions often hold a good amount of water and this water may hinder the browning. If this is the case, add a teaspoon of sugar during the browning to aid in caramelizing the vegetables.) To assist in the browning, scrape the crust and redistribute to insure even browning. Add the tomato paste to the vegetables and brown paste mixture for 4-5 minutes. Add the wine/port and scrape the bottom of the pan to deglaze all the bits. Lower the heat to avoid burning the mixture and reduce it by half.

Return the short ribs to the pan and add 2 cups of water or more until the ribs are just covered. Add the thyme and bay leaves. Cover with a lid or tightly secured foil and place in the oven for 3 hours. Check the ribs during the cooking time to ensure that the ribs remain under liquid; add water if necessary. Turn the ribs over halfway through the 3 hours. During the last 30 minutes, remove the lid to release moisture, thicken the braising liquid and encourage additional browning.Remove the pan from the oven and taste the braising liquid. If necessary, adjust the flavor by adding additional salt and/or sugar to balance out any acidity that may occur when tomatoes are included in a recipe.

I prefer to serve my short ribs over a basic soft polenta. They would also pair well with mashed potatoes or buttered egg noodles.

Patience

1471829_10202662838872511_968548253_nOne of the most important things I have ever learned in my food education is using the proper method to obtain the best out of an ingredient  Over the years, I have heard people state that some cuts of meat are tough and have little flavor.  When I dug a little deeper, I found that improper technique was at the core of these complaints.  Understanding protein, more importantly, the structure of protein, will and should dictate how you prepare it.  Commonly, we are told that the loin is the best cut of meat, be it a filet mignon or a pork tenderloin.  And even though I prepare these correctly, I am marginally unimpressed with the result.  I started to focus on cuts of meat that have more fat and require longer cooking times.  With little effort, the flavors I was looking for were found in this practice.  Braising and slow roasting have become some of my favorite ways to cook and eat.  This pork recipe speaks to my heart.  It’s all about embracing and taking advantage of the large amount of marbling on the shoulder cut to extract and spread that incredible flavor of pork fat. I don’t have a ‘healthier’ version of this recipe.  I don’t believe in avoidance of fat, but rather moderation of how you eat fat.  I serve this over creamy polenta and crispy kale

Pork Braised with Caramelized Onions and Garlic

  • 1 (3- to 4-lb) bone-in fresh pork shoulder half (preferably arm picnic)
  • 2 garlic cloves, cut into slivers
  • 1 tablespoon olive oil
  • 1 tablespoon clarified butter
  • 1 1/2 lb onions (5 or 6 medium), halved lengthwise, then cut lengthwise into 1/4-inch-thick slices
  • 10 whole garlic gloves
  • 3/4 cup unfiltered apple cider
  • 1/2 cup apple cider vinegar
  • 1/4 cup of marsala wine

Preheat oven to 325°F.

Score fat and any skin on pork in a crosshatch pattern. Make slits all over meat with a small sharp knife and insert a garlic sliver in each slit. Pat pork dry and generously season with salt and pepper.

Heat oil and butter in a 4- to 5-quart ovenproof heavy pot over moderately high heat until hot but not smoking, then brown meat on all sides, turning occasionally, about 8 minutes. Transfer pork to a plate.

Add onions and whole garlic cloves to pot and sauté over moderately high heat, stirring occasionally, until softened and starting to turn golden, about 5 minutes. Add 3/4 teaspoon salt and sauté, stirring occasionally, until onions are golden and caramelized, 8 to 10 minutes more.

Stir in cider, vinegar and marsala and return pork to pot.

Cover pot with a tight-fitting lid and braise pork in middle of oven until very tender, 2 1/2 to 3 hours.  Remove the pork from the pan and heat the liquid on medium-high to reduce to desired consistency/flavor.  Add salt to taste 

Homage

repealAs a child, I remember rainy days cooped up in the house. I would head to my room and bury my nose into a book to wait out the weather but would be called out by the aromas coming from the kitchen. Even though times could be rocky in my home, my mother always made wonderful food. My indoctrination into food and cooking was one of diligence and a commitment to the ‘old way’ of doing things.

My great uncle would send her dry chilies from Mexico and as she had always done, my mother would burn her hands as she removed their stems and seeds to prepare for toasting on the comal.. If we were lucky to get fresh chilies, she would char them in the oven or over the open flame of the range. My mother was not one to rely on convenience when it came to preparing food. It was one of her quirks.  She had two food processors, but chose to ground her chilies and garlic for her Roja sauce in a Molcajete just as my grandmother did.

In our home, the stove would have several pots going at one time. As always, my mom had a huge pot of pinto beans simmering away. Of course, that pot was preceded by the long and arduous process of ‘picking and sorting beans’. My mother would sit me at the kitchen table with two bowls, a bag of dried beans and a paper towel. In small manageable amounts, the beans would be poured on the towel and sifted through to remove any stones or imperfect legumes that happen to find themselves in the bag. One bowl for the undesirables and one bowl for the perfectly picked…It was pointless to take any shortcuts, for my mother would just scoop up my sifted pile, pour it out on the towel and direct me to start over. It was admirable; frustrating, but admirable. And although my mother was far from perfect, she nurtured and loved me through her cooking.

So, in gearing up for winter, I went looking for some of my favorite recipes and I stumbled across a dog-eared recipe card for my mother’s spaghetti sauce. There it was typed with the new typewriter I received for my birthday. Some ingredients didn’t even make it on the card. There weren’t any instructions either; those were saved to my memory.  Hands down, my mother had the best spaghetti sauce I had ever eaten…at least I thought so. I pleaded with her to show me how to make it and on one of those rainy days…we set out to do just that.

First she showed me how to dice an onion; first vertically, then horizontally and finally sliced crosswise. Then she pulled out the head of garlic and placed it in a kitchen towel. She tightly wound the towel and banged it against the counter; like magic, all the cloves separated. Next she grabbed a saucer and pushed down on the garlic cloves; the papery skins loosened and fell off. Since the garlic was small, my mother fearing a trip to the emergency room minced it herself.

The hardest part of this lesson was the dry ingredients. My mother NEVER measured anything. So on that day, I made her pour the ingredients in her hand and I would then take the measuring spoons to determine a quantifiable amount. However, some ingredients remained in their “handful” measurement. Over the course of my lesson she bestowed her hints and tricks; added sugar at the end to cut the acidity of the tomatoes, grated Parmesan cheese to help thicken the sauce; wine added at the end to retain the flavor. This would be my first foray into writing recipes.

I always thought that one day, my mother and I would be in my kitchen preparing food, but that day never came. I often find myself in the kitchen wondering what she would think of my cooking, would she be proud, would she recognize that I still follow her instructions? And when I prepare beans, I take out two bowls and a paper towel and head to the kitchen table.

Freezing and Simmering

After weeks of unseasonably warm weather, Sacramento was hit with a serious cold front.  Temperatures dropped below freezing and everywhere you could hear the natives getting restless.  I am born and raised here.  I can get through heat waves like nobody’s business.  But we aren’t accustomed to long periods of freezing weather.  And I am no exception.  However, I did look at it as an opportunity to follow some more favorable cold weather pursuits other than freezing my ass off; cooking and cocktailing.

Nothing signals the start of the fall and winter season for me as soups and stews; slow braised meats; and a stiff hot toddy.  On a particular cold Sunday, I knew it was time to bust out my favorite pot to get on with the business of split pea soup.  Last month, I took a long weekend to Fort Bragg in Mendocino County.  While there, I discovered Roundman’s Smokehouse.  I ‘discovered’ it several times on that trip and came home with many vacuum sealed bags of smoked pork chops and ham hocks.  I knew they were destined for my soup pot and I just had to wait for an opportunity to present itself.

Now, some people may think that I use an excessive amount of meat in this soup.  But, I don’t enjoy playing “Find the Ham” when I am eating split pea.  To me, it’s meant to be a hearty soup; a meal in a bowl.   The other cornerstone to this recipe is the ‘holy trinity’ of soups and sauces; the mirepoix of onions, celery and carrots.  To this, I also add whole garlic cloves.  It’s a rather straightforward recipe without much flash or fussing.  An added bonus; your house will smell intoxicating while it slowly simmers on the stove. Peasoup

Split Pea & Ham Soup

  • 3-4 tablespoons of unsalted butter
  • 2 large onions, diced
  • 2 cups of diced celery (include celery leaves)
  • 2 cups of diced carrots
  • 10 whole garlic cloves
  • 3-4 pounds of smoked ham hocks
  • 3 teaspoons dried French thyme
  • 3 cups green split peas
  • 10-12 cups of water
  • Salt and Pepper
  • ½ cup of chopped fresh parsley.

Melt butter in heavy large pot or Dutch oven over medium-high heat. Add onion, celery, garlic and carrots. Sauté until vegetables begin to soften, about 8 minutes. Add pork and thyme; stir 1 minute. Add peas, then water, and bring to boil. Reduce heat to medium-low. Partially cover pot; simmer soup until pork and vegetables are tender and peas are falling apart, stirring often, about 1 hour and 10 minutes. Transfer hocks to a bowl.

At this point, some people elect to remove half of the soup contents to puree.  However, if you refrain from putting salt in the soup until it has completely cooked, the peas will take in more water and this will allow the peas to break down themselves.  I have never pureed this soup and it has always been a perfect mix of pea puree, vegetables and pieces of pork.

To complete, cut pork off bones, dice and return to the soup. Season with salt and pepper. Finish with the fresh parsley.

Labor of Love

chili verdeI would have to say that my love of food, and cooking in general came from my mother.  She had a natural skill set and despite her years of chain smoking, her palate was quite good. Growing up in a Hispanic household, bland food was rarely if ever experienced and a resistance to spicy, flavorful food would have been a futile one. More than often, we ‘ate Mexican’ several times a week.  This usually consisted of frijoles días (day beans); whole pinto beans slowly cooked for hours with whatever bacon/pork fat that my mother kept on hand.  In addition to the beans was the obligatory Spanish rice, which had to be made fresh.  Even if we had plenty of leftover rice in the refrigerator, my mother insisted on making it fresh for dinner (leftovers were for lunches).

The dish that I most looked forward to, the dish that the beans and rice served as a vessel for was Chili Verde. Now, there seems to be some dispute as to who taught who this recipe or who was the originator in the family.  EIther way, I have never found another like it.  And I probably never will.  Unfortunately, my mother passed away before I was able to have her teach me.  So after her passing, I contacted her sister, my Aunt Virgie, to ask her to help me out.  I owe her a huge debt of gratitude for taking me through the process.

The ingredients are few, but the process would be considered laborious.  But then again, I have spent many hours doing absolutely nothing useful, like watching other people cook food on TV.  It’s just the ass-kicking reminder I need.

Chili Verde

35 fresh Anaheim chilies roasted and skinned *
5 pounds of cubed (1/2 inch) pork shoulder or country style pork ribs
15 garlic cloves minced
Vegetable oil and butter
Flour
Garlic Salt and Pepper
Water as needed.
Sugar

* Please note, roasting the chilies is a core part of the recipe and the result will not be the same. It does require some labor and dedication to igredients, but it is soooo worth it.

Remove the stem, but retain the seeds and veins for the heat. I shred the chilies by hand into strips.

Generously ‘garlic’ salt and pepper the meat. Toss with your hands to ensure even coverage.

Sprinkle ¼ cup of flour over the meat and also toss with hands for even coverage.

In a large heavy bottom Dutch oven type pan over high heat, melt 2 tablespoons of butter and 2 tablespoons of vegetable oil and brown the pork in batches so they are evenly covering the bottom and evenly browned.

You will have bits of pork and fat browning on the bottom. Once all the pork has been browned, add water in ½ cup increments as needed to the pan to deglaze.  Continue to heat to boil to scrape up all the brown bits until you are left with a broth liike consistency.

Add back all the pork and the garlic to the broth in the pan and mix well to incorporate. Add the strips of peppers and mix again. Heat the mixture until boiling, and then lower the heat to a very low simmer and cover.

Occasionally stir for an hour and then remove the lid, increase the heat just a bit and then continue to simmer and stir for another hour.

Once the liquid/sauce is at the consistency of your choice, the chilies have broken down and the pork is fork tender, add salt to taste. By following the ½ cup water measurement, the consistency would lean more toward a broth consistency rather than a sauce/gravy consistency. If you prefer a thicker sauce, add less water. To balance the flavor, add ½ to one tablespoon of sugar.